Last week,
while attending a call to discuss an integration interface between Maximo and an
Azure SQL database, the other consultant mentioned a few Azure terms like “blob
storage”; I realized I didn’t know anything about Azure despite the fact that
the cloud platform has been adopted by the large number of the clients I work
with. So today, I decided I should play around a bit with it by trying to
migrate a Maximo instance from my local VM to Azure.
Before I go
into the technical details, for those of you non-technical readers, I like to
sum up the whole experience I had with this platform in one word: magical. That’s
it, I went to the website, signed up for a trial account, followed some wizards
or clicked on a few buttons or menus that I think were features I need, and boom,
I got a running Maximo instance on the cloud in just a few hours. No training, no
muss, no fuss, everything just works. Not much else to say. I’m in love now. I
think will spend the next couple of weeks, months or even years to learn more
about Microsoft stuff.
Below are
the steps that I took:
1.1. Sign up for a
trial account. After created the account, I was given $260 AUD to spend on paid
services
|
|
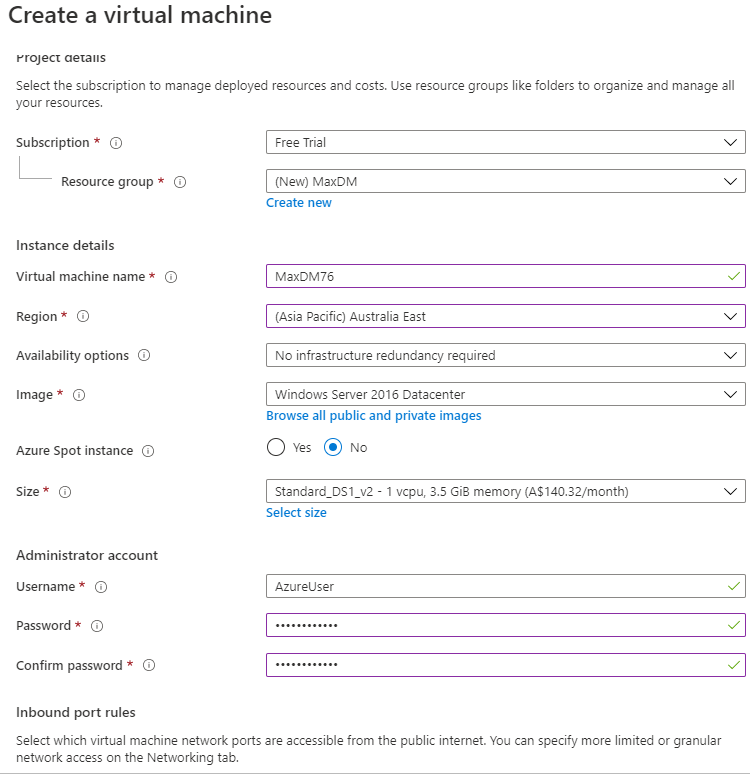
1.2. I went straight
to the portal and tried to create a new VM. Being cheap as I am, I went to
the lowest option of 1 CPU + 3.5GB RAM. I know to install Maximo, I’ll need
at least 8GB, but in this case, I just wanted to see if I can fit Windows, Websphere
and Maximo into a box this size
|
 |
1.3. Next page, I
gave the VM a 256GB SSD data disk
|
 |
1.4. For network
setting, I gave it a Public IP as I want to access Maximo from public Internet
|
 |
1.5. On the next few
pages, I left the default settings and proceeded to create the VM. After about
5 minutes, the VM was created. I clicked on “Connect”, and it downloaded an
RDP shortcut which will open the Remote Desktop app on my laptop and pre-populated
it with the IP address of the machine. I struggled at this step a bit because
I forgot that I created a Window user account in the 1st step. Thus,
I tried to use my Microsoft account instead and it failed. After a few failed
attempts and a quick google search, I remembered the details and entered MaxDM76\AzureUser
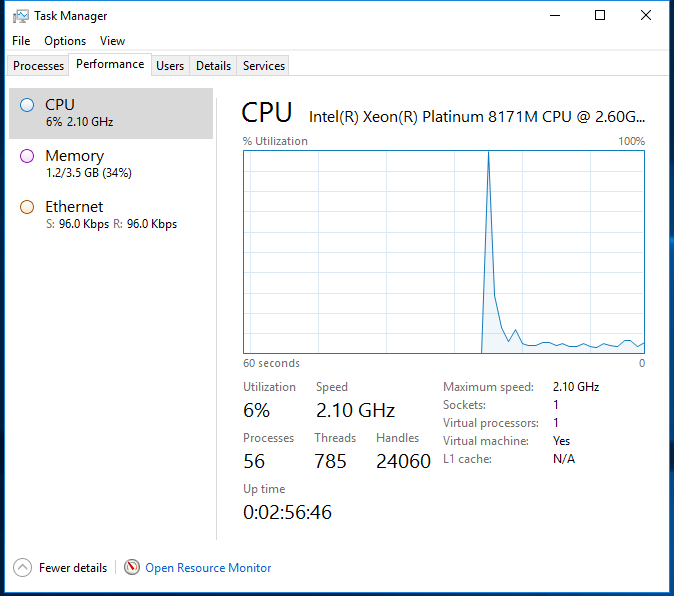
for account name, could login with that. The machine is extremely fast and
responsive, feels like working on a local server rather than some remote
sessions on the cloud (Now I remember how frustrating I was having to deal with
the sluggish Maximo SaaS Flex DEV server). Download files gave me a rate of 50-70MB/s
(that’s megabytes per second not Mbps)
|

<This screen was
captured after the fact as I forgot to take a screenshot of this step>
|
2.1 Next step, I tried
to create an SQL DB. I put it in the same Resource Group as the Maximo App
Server VM Because, naturally, I think all resources for an application should
be put in one Resource Group as the name suggests. To be honest, I still have
no idea what it is now.
On the “Server”
drop-down, since it is empty, I had to click on “Create New” and created a
new server. I think we cannot remote access to this one like a VM, just a logical
name to manage an SQL instance.
|
 |
2.2 On the Networking
page, I chose Public Endpoint for Connectivity Method because I
thought I need to access the DB from SQL Studio on my Laptop, and Allow
Azure services and resources to access this server because I think this
option lets Maximo on App Server VM to access the DB. It turned out I couldn’t
figure out how to access the DB using SQL Studio on my laptop (more on this
later), but the second option works exactly as it supposed to do.
|
 |
2.3 Default settings
for the next few pages then I proceeded to create the DB.
|
 |
2.4 I attempted to
connect to the DB using SQL Studio on my laptop but it didn’t work. However, I
tried to install SQL Studio on the Azure VM and it worked on the first try.
|
 |
3.1 Now I had a
server and a DB, I proceeded with Maximo migration. I backed-up the SQL DB in
my VM to a DMP file, uploaded it to Azure VM, and tried to Restore it to
Azure SQL. It turned out on-premises SQL Server is different to Azure SQL,
and I can’t do that. A quick google search revealed that I had to export the DB
into a *.bacpac file, then import it to Azure.
|
 |
3.2 The whole
export/import of bacpac file was straight-forward with a minimum number of clicks,
and no confusion. After it’s done, I realized the import process restored the
DB from my VM, and I ended up with two DBs, so I had to delete the empty one
I created in the earlier step.
|
 |
3.3 I struggled a
bit trying to create a new ‘maximo’ user. Turned out the way security
logins and users are managed in Azure SQL is a bit different, so after a bit
of googling, I found some scripts I could use. So here is the notes I wrote
down for this step
|
- Right click the
"Database Folder", to add a new Query window:
CREATE LOGIN maximo WITH PASSWORD =
'SuperSecret!'
- Right click the
'maxdm7609' to add a new Query window:
CREATE USER maximo FOR LOGIN maximo WITH
default_schema = dbo;
ALTER ROLE db_owner ADD MEMBER maximo;
|
4.1 Next step is to
install Websphere, a quick check before installing showed I had 2.3 GB RAM left,
I thought could make Websphere to take 1GB and Maximo 1GB, so I proceeded
with the installation.
|
 |
4.2 It turned out
that although I can install Websphere successfully, the automated process to prepare
the environment for Maximo failed due to Out-of-Memory error. I know we could
manually configure WebSphere and make it
works, but what’s the point in wasting time doing that? So I uninstalled
Websphere, upgrade the VM to the next lowest option which has 2 CPU
and 8GB RAM, then attempted to install Websphere again, which worked
this time.
|
 |
4.3 I uploaded a pre-built
maximo.ear file from my local laptop to Azure VM, deployed it to Websphere,
then updated the connection string to point to the Azure SQL DB. Connection
string is almost exactly the same as connecting Maximo to a local SQL DB. And
it worked immediately after I tried to start MXServer after deployment.
(Installing
Websphere and Deploying maximo is not the topic of this post, so I’m not
going to put the details of those steps here)
|
 |
5.1 Now I got Maximo
running on the VM, I wanted to access it from the Web, so I went to the VM’s
Networking page, and opened port 80 inbound for the VM, but it still didn’t
work. After a bit of fussing around, I remembered I had to open the port on
the VM’s Windows Firewall as well. After opened port 80 on both two firewalls,
it worked like a charm, I could access Maximo from my laptop using the VM’s
public IP
|
 |
5.2 I wanted to have
a DNS to access it as well, so in the VM’s IP setting, I set it to Static
(which I think will prevent it to change even if I shutdown the VM), and put
a DNS name label.
|
 |
5.3 Right after I
clicked on Save, I can access Maximo using a DNS alias. Mission
accomplished
|
 |
I have a
fair share of experience with various software and platforms ranging from great,
good, bad, or horrible. I can live with bad software, but it irritates me to
the bone. I feel good when playing with good software. In this case, I think
Microsoft has done everything right designing the Azure platform, I felt
nothing but joy throughout this whole learning process. My next step is probably
to recommend anyone I meet to put Maximo on Azure if they are considering moving
to cloud.
Great.. enjoyed reading it. Will try the same.
ReplyDeleteThe information you've shared on Azure Migration has really pleased me. It's a fascinating article, both for me and for others. Thank you for bringing such interesting topics to our attention.
ReplyDelete